Webpack
As you know, DMP automatically creates links for your static files. When you render app/templates/mypage.html, DMP creates a script tag for app/scripts/mypage.js and a style tag for app/styles/mypage.css. This is the default configuration.
Today’s production sites generally bundle scripts, styles, and other static assets into combined, optimized files that improve speed and enable better browser caching. DMP comes with support for bundling with Webpack.
These bundles can be created in at least two ways:
- A bundle for each app. If you have four DMP apps, you’ll have four bundles. This approach is described below.
- A single bundle for your entire site. If you have four DMP apps, you’ll have one bundle. This approach is described near the end of this document.
Creating Bundles
Lots of different Javascript files exist in a project. Some are project-wide, such as jQuery. Some are full apps, such as React or Vue apps. These generally get bundled in their own ways and don’t need DMP’s involvement.
DMP-style scripts are coupled with their templates. They aren’t generally self-contained “apps” but add behavior to their templates (although they might start React apps or other components). When mypage.html displays, we need mypage.js to run.
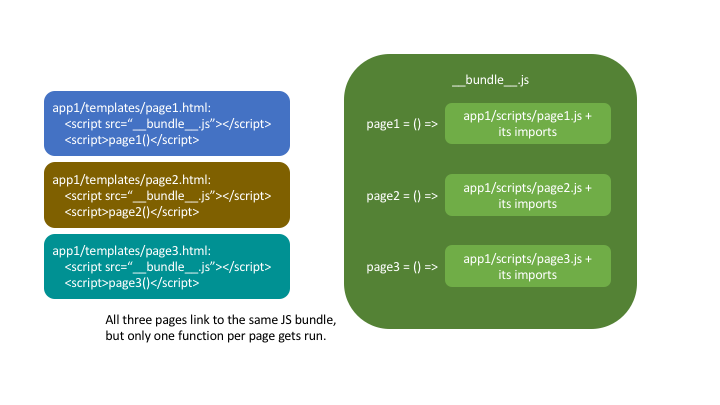
Herein lies the issue that this provider solves: if we bundle several of these scripts together–such as all the scripts in an app–loading the bundle into a page will run not only mypage.js, but also otherpage.js and otherpage2.js. Since the bundle contains scripts for many pages, we need to selectively run a small part of the bundle.
This provider wraps each script inside a function inside the larger bundle. Since the bundle is a map of template names to functions, the page scripts load but don’t run. DMP manually triggers the right ones for the current template.
Tutorial
Let’s create a “normal” Django/DMP project and then convert it to a “bundle-endabled” Django/DMP project.
A note before continuing: JS bundling can be difficult for Python developers at first because it’s based in fundamentally different thinking than the Python world is. Python compiles .py files to .pyc, but otherwise keeps the source structure at runtime. Bundling requires setting up npm,node_modules, and multiple config files. As of 2018, Javascript’s import landscape is a battleground of similar-looking but quite different standards and libraries: <script src=>, jQuery plugins, CommonJS,AMD, RequireJS, npm, yarn, ES6 import standards, and dynamic imports. For Python devs who are used to a benevolent dictator solving divisive issues (like Guido did with them if x else ndebate), the chaotic and evolving JS ecosystem can be overwhelming. If you are new to bundling, take the time to read the documentation onnpmandwebpackand create a small Node JS web site.
Create a DMP project
The installation steps for DMP are given elsewhere in these documents, so take a detour if you need detailed instructions. Here’s a review for those need a quick summary:
pip3 install --upgrade django-mako-plus
python3 -m django_mako_plus dmp_startproject mysite
cd mysite
python3 manage.py migrate
python3 manage.py createsuperuser
python3 manage.py dmp_startapp homepage
# Finally, open settings.py and add "homepage" to your INSTALLED_APPS
pip install --upgrade django-mako-plus
python -m django_mako_plus dmp_startproject mysite
cd mysite
python manage.py migrate
python manage.py createsuperuser
python manage.py dmp_startapp homepage
# Finally, open settings.py and add "homepage" to your INSTALLED_APPS
Run your project, and ensure the “Welcome to DMP” page comes up. If not, head over to the DMP installation pages for ideas.
Note that your new project already contains homepage/scripts/index.js. The tutorial showed how this anonymous, self-invoking function was called. In webpack, however, we do things a little differently. Modify the index.js file to export a default function:
// homepage/scripts/index.js
export default function(context) {
    // utc_epoch comes from index.py
    console.log('Current epoch in UTC is ' + context.utc_epoch);
}
Let’s also add base.js to see inheritance working:
// homepage/scripts/base.js:
export default function(context) {
    console.log('In base.js!')
}
You should now have two JS files: index.js and base.js. Since template index.html inherits from template base.html, both JS files should run when we view index.html.
Initialize Node
Install Node from https://nodejs.org. After installation, open a terminal and ensure you can run npm from the command line.
npm --version
npm --version
Initialize the npm repository and install webpack. When asked, just accept the defaults for package name, version, etc.
cd mysite/
npm init
npm install --save-dev webpack webpack-cli style-loader css-loader glob
# if using git, add "node_modules/" and ".cache" to your .gitignore file
cd mysite/
npm init
npm install --save-dev webpack webpack-cli style-loader css-loader glob
# if using git, add "node_modules/" and ".cache" to your .gitignore file
The above commands changed your project a little:
- The
node_modulesdirectory exists in your project root and contains dozens of Javascript packages, including core Node packages and webpack-related dependencies. This directory is the Javascript equivalent topip3, a virtual environment, and python site-packages. This directory can be recreated anytime by runningnpm install. - The
package.jsonfile in your project root contains a list of npm package dependencies. If you open the file, you’ll notice thatwebpackis listed as a development dependency (it isn’t needed at production, so it’s in “devDependencies”).
Let’s create some shortcut comands to make running webpack easier. These are defined in package.json under the scripts key, like this:
{
    ...,
    "scripts": {
        "watch": "webpack --mode development --watch",
        "build": "webpack --mode production"
    }
}
The above two scripts can be run with npm run watch and npm run build, but we’re not quite ready to run them yet. So hold up, Tex.
Create the Entry File
Webpack requires one or more “entry” files as starting points for its bundles. In Node applications and single-page webapps, a “main” JS file runs everything. Multi-page, Django-style web sites are different: each page is essentially an “app” that requires a new bundle.
That means our Django/DMP projects have lots of entry points: the login page, password change page, user information page, and so forth. We don’t really have an “entry” page to point webpack at.
That’s where DMP comes in. DMP understands your project structure, including how templates, scripts, and styles directories are connected. DMP will create homepage/scripts/__entry__.js as the “entry” file for our homepage app.
Run the following to create the __entry__.js file:
python3 manage.py dmp_webpack --overwrite
python manage.py dmp_webpack --overwrite
When the command finishes, you’ll have a new file, homepage/scripts/__entry__.js, that points to the scripts and styles in the app. Check out the file to see what DMP created.
Now that you’ve seen the result, let’s rewind and detail the discovery process:
- DMP deep searches the templates directory
homepage/templates/for all files (except those starting with double-underscores, like__dmpcache__. DMP finds three files:homepage/templates/base_ajax.htm homepage/templates/base.htm homepage/templates/index.html
- DMP loads each file as a template object (as if it were about to be rendered) and runs its Providers,
CssLinkProviderandJsLinkProvider. These two providers are the defaults, but you can customize them in settings.py (seeWEBPACK_PROVIDERS).Since providers are built to discover the script and style files that are associated with templates, DMP uses them to find the files needed for our bundle:
homepage/templates/base_ajax.htm    # has no scripts or styles, so DMP skips it
homepage/templates/base.htm         # DMP finds base.js and base.css
homepage/templates/index.html       # DMP finds index.js and index.css
The providers yield four files, shown here as a list relative to the scripts directory:
[ "./base.js", "../styles/base.css", "./index.js", "../styles/index.css" ]
- DMP creates
homepage/scripts/__entry__.js, which it will use later as Webpack’s entry point. This file contains a number of ES6 dynamic import statements surrounded by function closures:DMP_CONTEXT.loadBundle({ "homepage/index": () => [ import(/* webpackMode: "eager" */ "./index.js"), import(/* webpackMode: "eager" */ "./../styles/index.scss"), ], "homepage/base": () => [ import(/* webpackMode: "eager" */ "./base.js"), import(/* webpackMode: "eager" */ "./../styles/base.scss"), ], })The “eager” hint tells webpack to keep these imports in the parent bundle.
Configure and Run Webpack
We need to tell webpack to start with our entry file. Create a file in your project root called webpack.config.js:
const path = require('path');
const glob = require('glob');

// map the entry files: { app: entry file, ... }
const entries = glob.sync("./*/scripts/__entry__.js").reduce((acc, fp) => {
    acc[fp.split(path.sep)[1]] = fp;
    return acc;
}, {});

// print our findings (just for this tutorial)
console.log(entries);

// webpack config
module.exports = {
    entry: entries,
    output: {
        path: path.resolve(__dirname),
        filename: '[name]/scripts/__bundle__.js'
    },
    module: {
        rules: [{
            test: /\.css$/,
            use: [
                { loader: 'style-loader' },
                { loader: 'css-loader' }
            ]
        }]
    }
};
Thanks to the magic of globs, the above config finds all entry files in your project.
You can set the destination to be anywhere you want (such as adist/folder), but it’s just fine to put them right in yourapp/scripts/folder. DMP only puts template-related scripts into__entry__.js, so you won’t get infinite bundling recursion by putting the bundle in the same directory. If you decide to change the location, be sure to modify the provider filepath settings to match.
Let’s run webpack in development (watch) mode. After creating our initial bundle, webpack continues watching the linked files for changes. Whenever we change the entry file, script files, or style files, webpack recreates the bundle automatically. Run the following:
npm run watch
npm run watch
Assuming webpack runs successfully, you now have homepage/scripts/__bundle__.js. If you open it up, you’ll find our JS near the end of the file.
Living in Two Terminals
Now that you’re using bundles, you need TWO terminals running during development. The following should be running in their own terminal windows:
python3 manage.py runserveris your normal Django web server.npm run watchrecreates bundles you modify the support files.
Bundle Links in Templates
As you learned in other sections, DMP automatically creates <script> and <style> links in your html templates. In our project, this happens in base.htm, during the call to ${ django_mako_plus.links(self) }. By default, DMP uses Providers to generate old-style script and style tags directly to the respective files.
We need swap the default Providers with bundle-basd Providers link to homepage/scripts/__bundle__.js. This is done by setting CONTENT_PROVIDERS in settings.py:
TEMPLATES = [
    {
        'NAME': 'django_mako_plus',
        'BACKEND': 'django_mako_plus.MakoTemplates',
        'OPTIONS': {
            # providers - these provide the <link> and <script> tags that the webpack providers make
            'CONTENT_PROVIDERS': [
                { 'provider': 'django_mako_plus.JsContextProvider' },
                { 'provider': 'django_mako_plus.WebpackJsLinkProvider' },
            ],
        }
    }
]
These new Providers give the following behavior:
JsContextProvideris the same as before. It sets values from the view into the JS context.WebpackJsLinkProidercreates the link for the bundle:<script src="/static/homepage/scripts/__bundle__.js">and calls the bundle functions for the current template.- If you prefer to bundle CSS and JS separately, enable code splitting in webpack’s config and add
django_mako_plus.WebpackCssLinkProviderto the content providers list. This tutorial puts everything in the JS bundle for simplicity.
Test It!
We’ve configured webpack, created the entry file and output bundle, and set DMP to link correctly. The only thing remaining is to run the Django server and see the benefits of your work!
# in terminal 1:
python3 manage.py runserver

# in terminal 2:
npm run watch
# in terminal 1:
python manage.py runserver

# in terminal 2:
npm run watch
Grab some popcorn and a drink, and take your browser to http://localhost:8000/. Be sure to check the following:
- Right-click and Inspect to view the JS console. The messages in our .js files and/or any errors will show there.
- Also in the inspector, check out the CSS rules (which are now coming from the bundle).
- Right-click and view the page source. You’ll see the links that DMP created. If you see the old
<script>and<style>links, check your settings file.
Building for Production
To create a production bundle, issue webpack a build command:
npm run build
npm run build
If you look at the generated bundle file, you’ll find it is minified and ready for deployment.